Today is the last pattern! We’re almost done!! Though I am sad to be seeing this crochet along end :(. It has been so fun seeing everyone’s dolls. Before we get on with the Week 4 doll pattern, let’s take a look at everyone’s progress from last week’s pattern. Here’s my dolly …
This week we finish up with our little baby doll. This one should work up super quick. If you missed any of the patterns, just click here for all the parts or use the arrows at the bottoms of the posts to go forward or back one.
Baby Doll Pattern
Finished doll measures approx. 13⁄8″ (3.5 cm) tall.
Gauge = 10 sc and 10 rows = 2″ (5 cm) in sc stitch.
Body
With color A, make a ring.
Rnd 1: Sc 5 times into ring—5 sc, pm in last stitch of rnd, do not turn. Cont to move marker up each rnd.
Rnd 2: 2 Sc in each of 5 sc—10 sc, do not turn.
Rnds 3 and 4: Sc in each st around, do not turn.
Rnd 5: *2 Sc in next sc, sc in next sc; rep from * around—15 sc, do not turn.
Rnds 6 and 7: Sc in each st around, fasten off yarn, do not turn. Change to color F.
Rnd 8: Sc in each st around, do not turn. Stuff with fiberfill as you work.
Rnd 9: *Sc2tog, sc in next st; rep from * around—10 sc, do not turn.
Rnd 10: *Sc2tog; rep from * around—5 sc. Sl st in next st, fasten off, leaving 6″ (15 cm) tail. Weave in yarn tail.
Face
With color C, make a ring.
Rnd 1: Sc 6 times into ring—6 sc.
Sl st in next st, fasten off, leaving 16″ (40.5 cm) tail, which will be used to sew face to top.
Hair
With color D, ch 4, fasten off, leaving 16″ (40.5 cm) tail, which will be used to sew hair to face.
Finishing
Arrange hair piece placing along top edge of face and sew in place with yarn tail.
With black thread and 2 small black beads, sew to face for eyes. Sew a smile with red thread. Cut two 1/8″ (3 mm) circles (see diagram) of pink felt for cheeks. Sew to face with pink thread. Arrange embellished face with hair edge along Rnd 10 of top and sew in place. Split
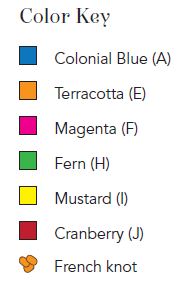
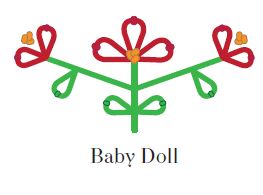
yarn to embroider flowers below face, from bottom edge up along side by following diagram for Small Doll using daisy stitch for flowers, French knot for centers, and straight stitch for stems.

Stitchy Nesting Dolls were designed by Amy Gaines and appear in Bara, B. (2013). Crochet at Home: 25 Clever Projects for Colorful Living. Interweave Press. Crochet along approved and pattern reprinted with permission from Interweave Press. Photography by Joe Hancock.
Crochet at Home can be purchased from Amazon, Barnes & Noble, and Interweave.


Wow, this is an awesome pattern. I Jim’s through the pattern, but it’s the middle of the night and I don’t have my reading glasses lol. Can you tell me to hook sizes change? Thank you for going through the trouble of sharing this pattern. I clicked on the Amazon link purchase the book ❤️. Have a beautiful day, I would love to learn about the various crocheting groups you’ve mentioned. I don’t really do Facebook. I don’t know how 😂.
Me encantan Las muñequitas ,gracias ,trataré de hacerlas
Wow Kara, you have created a beautiful army of dolls already! Aren’t they lovely?
Aren’t they all so cute, I love all the different hair styles haha. 🙂