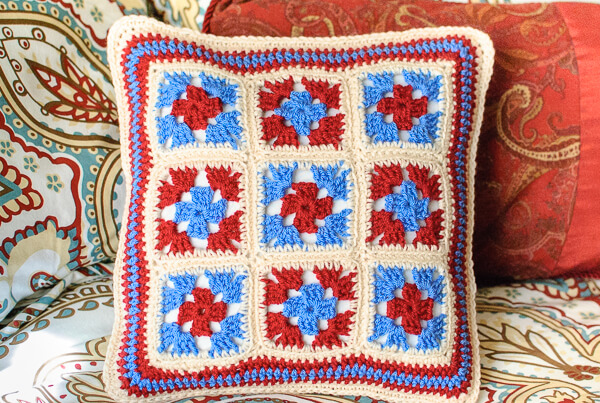
I have two pretty crochet pillow patterns to share with you today. I recently bought a new comforter set for my bedroom and wanted to make some coordinating pillows to add a little handmade charm to the decor. And granny pillows they were! I made them reversible with small grannies on one side and a large granny on the other. You can choose to make both sides the same if you’d like or even just choose one crochet panel and add a fabric backing. Let’s give it a go!
Granny Crochet Pillow Patterns
Here’s what you need:
- 14 in. × 14 in. pillow insert
- 3 colors worsted weight yarn
- H hook
- tapestry needle and scissors
Resources and tutorials you may find helpful in following this crochet pattern: Crochet Abbreviations, U.S. to U.K. Crochet Conversion Chart, How to Make a Magic Ring {photo & video tutorial}.
Small Granny Squares Crochet Pattern
(Make 4)
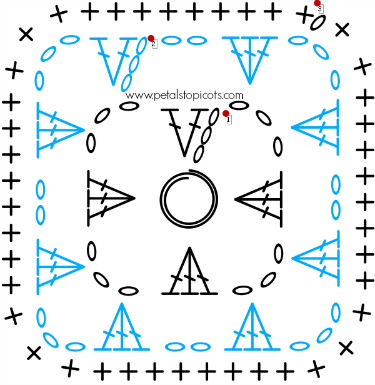
With CA, make a magic ring. (As an alternative to the magic ring method, you can ch 4 and join in furthest ch from hook to form a ring.)
Round 1: Ch 3 (counts as dc), 2 dc in ring, ch 3, *3 dc in ring, ch 3, repeat from *twice more, join in top of beg ch, drop CA — 12 sts.
Round 2: Join CB in any ch-3 sp, ch 3 (counts as dc), work [2 dc , ch 3, 3 dc] in same ch-3 sp, ch 2 *[3 dc, ch 3, 3 dc] in next ch-3 sp, ch 2, rep from * twice more, join in top of beg ch, drop CB — 24 sts.
Round 3: Join CC in any ch-3 corner sp, ch 1 (does not count as st), work 1 sc in same corner ch-3 sp, 1 sc in each of the next 3 sts, 2 sc in ch-sp, 1 sc in each of the next 3 sts, *3 sc in corner ch-3 sp, 1 sc in each of the next 3 sts, 2 sc in ch-sp, 1 sc in each of the next 3 sts, rep from * twice more, work 2 sc in last corner ch-3 sp, join and fasten off — 44 scs.
(Make 5)
With CB, make a magic ring. (As an alternative to the magic ring method, you can ch 4 and join in furthest ch from hook to form a ring.)
Round 1: Ch 3 (counts as dc), 2 dc in ring, ch 3, *3 dc in ring, ch 3, repeat from *twice more, join in top of beg ch, drop CA — 12 sts.
Round 2: Join CA in any ch-3 sp, ch 3 (counts as dc), work [2 dc , ch 3, 3 dc] in same ch-3 sp, ch 2 *[3 dc, ch 3, 3 dc] in next ch-3 sp, ch 2, rep from * twice more, join in top of beg ch, drop CB — 24 sts.
Round 3: Join CC in any ch-3 corner sp, ch 1 (does not count as st), work 1 sc in same corner ch-3 sp, 1 sc in each of the next 3 sts, 2 sc in ch-sp, 1 sc in each of the next 3 sts, *3 sc in corner ch-3 sp, 1 sc in each of the next 3 sts, 2 sc in ch-sp, 1 sc in each of the next 3 sts, rep from * twice more, work 2 sc in last corner ch-3 sp, join and fasten off — 44 scs.
Joining Small Grannies
Once you have all your grannies made it’s time to join them. We are going to make 3 rows with 3 grannies in each row, making sure to alternate colored squares as shown in the photo at the top of the page. To join squares, put right sides together and using CC Slip stitch through the top loops of the squares.

Once you have joined 3 squares in a row, start on your next row, and then the next. Then join the rows together in the same way as you joined the square … with right sides together and Slip stitching through the top loops only.

Granny Border
Now that all your squares are attached we can work the border.
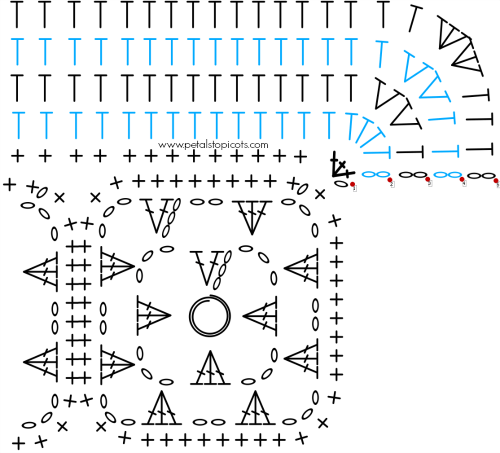
Round 1: Join CC in one of the corner stitches, ch 1 (does not count as st), work 3 sc in same corner st, work 32 evenly spaced sc across edge to next corner (10 scs across each square plus 1 sc at the point where they join), *work 3 sc in next corner st, work 32 evenly spaced sc across next edge to next corner, rep from * twice more, join — 140 sts.
Round 2: Join CB, ch 2 (counts as hdc), *work 4 hdc in corner st, work 1 hdc in each st across to next corner, rep from * around, join — 152 sts.
Round 3: Join CA, ch 2 (counts as hdc), work 1 hdc in next st, 2 hdc in each of the next 2 corner sts, *work 1 hdc in each of the next 36 sts, 2 hdc in each of the next 2 corner sts, rep from * twice more, work 1 hdc in each of the last 34 sts, join — 160 sts.
Round 4: Join CB, ch 2 (counts as hdc), work 1 hdc in each of the next 2 sts, 2 hdc in each of the next 2 corner sts, *work 1 hdc in each of the next 38 sts, 2 hdc in each of the next 2 corner sts, rep from * twice more, work 1 hdc in each of the last 35 sts, join — 168 sts.
Round 5: Join CC, ch 2 (counts as hdc), work 1 hdc in each of the next 3 sts, 3 hdc in each of the next 2 corner sts, *work 1 hdc in each of the next 40 sts, 3 hdc in each of the next 2 corner sts, rep from * twice more, work 1 hdc in each of the last 36 sts, join — 184 sts.
Fasten off.
Voila! You have now finished a panel to fit a 14 in. × 14 in. pillow insert. You can either attach the crocheted panel to a piece of fabric to complete your pillow case, crochet a second panel in the same design as this one, or continue on to make the large granny square as your backing.
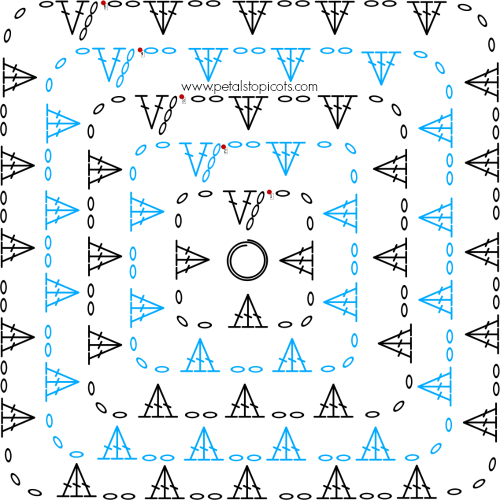
Large Granny Square Crochet Pattern
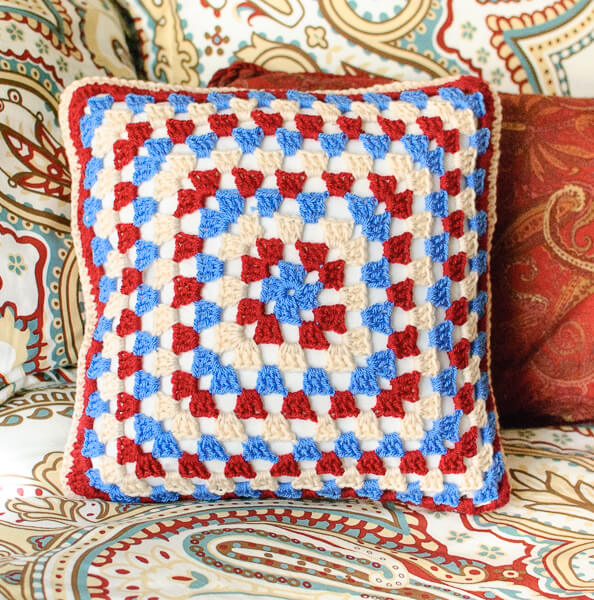
With CA, make a magic ring. (As an alternative to the magic ring method, you can ch 4 and join in furthest ch from hook to form a ring.)
Round 1: Ch 3 (counts as dc), 2 dc in ring, ch 3, *3 dc in ring, ch 3, repeat from *twice more, join in top of beg ch, drop CA — 12 sts.
Round 2: Join CB in any ch-3 sp, ch 3 (counts as dc), work [2 dc , ch 3, 3 dc] in same ch-3 sp, ch 2 *[3 dc, ch 3, 3 dc] in next ch-3 sp, ch 2, rep from * twice more, join in top of beg ch, drop CB — 24 sts.
Round 3: Join CC in any ch-3 sp, ch 3 (counts as dc), work [2 dc , ch 3, 3 dc] in same ch-3 sp, *ch 2, 3 dc in next ch-2 sp, ch 2, [3 dc, ch 3, 3 dc] in next ch-3 sp, rep from * twice more, ch 2, 3 dc in next ch-2 sp, ch 2, join in top of beg ch, drop CC — 36 sts.
Round 4: Join CA in any ch-3 sp, ch 3 (counts as dc), work [2 dc , ch 3, 3 dc] in same ch-3 sp, *ch 2, 3 dc in next ch-2 sp, ch 2, 3 dc in next ch-2 sp, ch 2, [3 dc, ch 3, 3 dc] in next ch-3 sp, rep from * twice more, ch 2, 3 dc in next ch-2 sp, ch 2, 3 dc in next ch-2 sp, ch 2, join in top of beg ch, drop CA — 48 sts.
Round 5: Join CB in any ch-3 sp, ch 3 (counts as dc), work [2 dc , ch 3, 3 dc] in same ch-3 sp, *ch 2, 3 dc in next ch-2 sp, ch 2, 3 dc in next ch-2 sp, ch 2, 3 dc in next ch-2 sp, ch 2, 3 dc in next ch-2 sp, ch 2, [3 dc, ch 3, 3 dc] in next ch-3 sp, rep from * twice more, ch 2, 3 dc in next ch-2 sp, ch 2, 3 dc in next ch-2 sp, ch 2, 3 dc in next ch-2 sp, ch 2, 3 dc in next ch-2 sp, ch 2, join in top of beg ch, drop CB — 60 sts.
Rounds 6 through 11: Continue pattern and color sequence as done in previous rounds, adding an additional repeat of “3 dc in next ch-2 sp, ch 2″ along each side for each round ending with 132 sts.
Round 12: Continuing with CB, ch 1 (does not count as st), work 1 sc in next 3 sts, work 3 sc in corner ch-sp, *work 1 sc in each st and in ch-sp across to next corner, work 3 sc in next corner ch-sp, rep from * twice more, work 1 sc in each st and in each ch-sp across, join and fasten off — 184 sts.
Finishing
As mentioned earlier, each pattern will make a panel to fit a 14 in. × 14 in. pillow insert. You can use the panels together to make a reversible crochet pillow or you can make two of the same style to use as a matching front and back. You can even make a fabric backing to attach to your crocheted panel.
If you choose to make a crocheted back and front, you can join the sides in a similar way as you did for the individual small granny squares except we are going to hold the wrong sides facing each other this time. Slip stitch through top loops of pieces along 3 sides. Insert pillow into open side and then continue Slip stitching across to close. Fasten off and weave in ends.
How’d you do? I would love to see your finished pics. Feel free to share them on my Facebook page!


These are beautiful. I love different granny squares. Thank you for the pattern.
Hi won’t the pillow foam come out of the holes, if you don’t line it with fabric?
I made a pillow but lined it with fabric before inserting the foam or else the foam was poking out of the holes.
I am just asking for an idea.
I used a pillow insert instead of just stuffing.
you use a pillow form already stuffed.
I love granny squares and what a wonderful pattern to personalize purchased bedding. I love your creations!
My website will be up and running shortly.
My Best,
Jacqueline
love these pillows! appreciate your sharing the pattern with us 🙂
I do not quite understand what you mean about slip stitching through the top loops for joining. Do you mean under both top loops of each square, or one top loop of each square? Could you please explain because I can’t see it in the pictures.
Thank you and these are very pretty!
To join squares you would slip stitch through both loops because if you just used one loop then you would have a ridge left by the loop you didnt use.