Stitch up this charming crochet tree skirt for your Christmas decor! I have included lots of diagrams and photos to help guide you through!
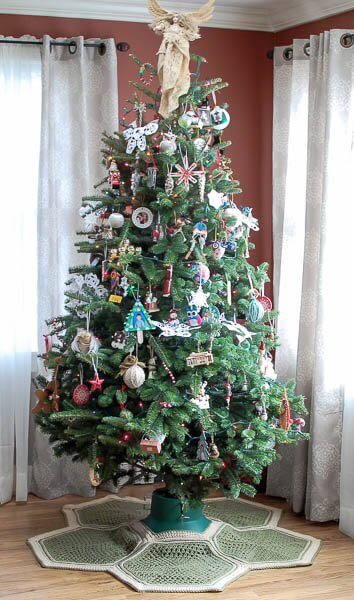
I can’t wait to see all the different color variations you all come up with!
Granny Hexagon Crochet Tree Skirt
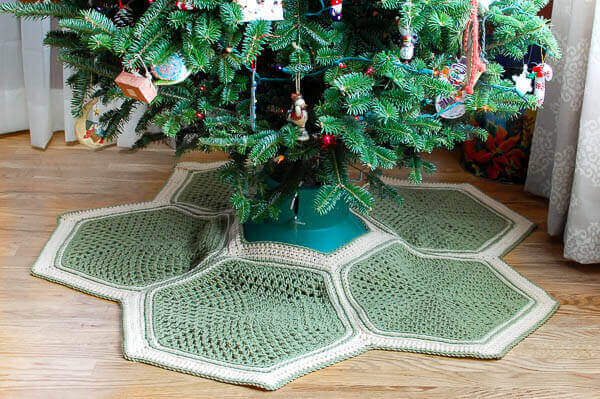
Here is what you will need:
- 2 colors of worsted weight yarn (shown here in Lion Brand Vanna’s Choice)
- Color A = Dusty Green, 4 skeins (340 yd each)
- Color B = Linen, 2 skeins (340 yd each)
- US I-9 / 5.5 mm crochet hook
- scissors and yarn needle
Resources and tutorials you may find helpful in following this crochet pattern: Crochet Abbreviations, U.S. to U.K. Crochet Conversion Chart, How to Make a Magic Ring {photo & video tutorial}.
Add this pattern to your Ravelry library.
Finished tree skirt measures approximately 55 in. × 55 in.
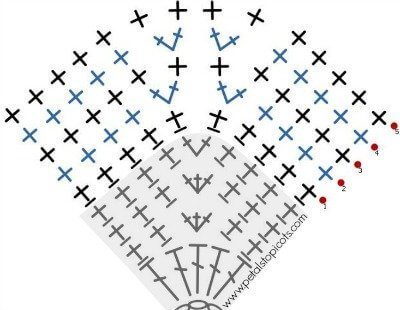
Special Stitch: 2 double crochet cluster (2dc-cl) – *Yarn over, insert hook in stitch, draw up a loop, yarn over and pull through 2 loops on the hook (2 loops on hook), in same stitch rep from *once more (3 loops on hook), yarn over and pull loop through all 3 loops on hook.
*Note: As written the pattern uses 6 hexagons to make a perfect flat hexagon skirt that can go around the base of a tree stand and so that the edges will meet. If you want it to slightly cone in the center to go up the stand you can use 5 hexagons instead.
Granny Hexagons (*make 6)
With CA, make a magic ring (as an alternative to the magic ring, you can ch 4 and join with a slip stitch in furthest chain from hook to form a ring).
Round 1: Ch 2, 1 dc in ring (counts as 2dc-cl here and throughout), ch 2, *2dc-cl in ring, ch 2, rep from * 4 more times, join in top of first st — 6 2dc-cl, 6 ch-2 corners.
Round 2: Sl st in next ch-sp, ch 2, 1 dc in same ch-sp, ch 3, 2dc-cl in same ch-sp, ch 2, *[2dc-cl, ch 3, 2dc-cl] in next ch-sp, ch 2, rep from * 4 more times, join — 12 2dc-cl, 6 ch-2 sp, 6 ch-3 corners.
Round 3: Sl st in next ch-sp, ch 2, 1 dc in same ch-sp, ch 3, 2dc-cl in same ch-sp, ch 2, 2dc-cl in next ch-2 sp, ch 2, *[2dc-cl, ch 3, 2dc-cl] in next ch-3 sp, ch 2, 2dc-cl in next ch-2 sp, ch 2, rep from * 4 more times, join — 18 2dc-cl, 12 ch-2 sp, 6 ch-3 corners.
Round 4: Sl st in next ch-sp, ch 2, 1 dc in same ch-sp, ch 3, 2dc-cl in same ch-sp, ch 2, (2dc-cl in next ch-2 sp, ch 2) twice, *[2dc-cl, ch 3, 2dc-cl] in next ch-3 sp, ch 2, (2dc-cl in next ch-2 sp, ch 2) twice rep from * 4 more times, join — 24 2dc-cl, 18 ch-2 sp, 6 ch-3 corners.
Round 5: Sl st in next ch-sp, ch 2, 1 dc in same ch-sp, ch 3, 2dc-cl in same ch-sp, ch 2, (2dc-cl in next ch-2 sp, ch 2) 3 times, *[2dc-cl, ch 3, 2dc-cl] in next ch-3 sp, ch 2, (2dc-cl in next ch-2 sp, ch 2) 3 times, rep from * 4 more times, join — 30 2dc-cl, 24 ch-2 sp, 6 ch-3 corners.
Round 6: Sl st in next ch-sp, ch 2, 1 dc in same ch-sp, ch 3, 2dc-cl in same ch-sp, ch 2, (2dc-cl in next ch-2 sp, ch 2) 4 times, *[2dc-cl, ch 3, 2dc-cl] in next ch-3 sp, ch 2, (2dc-cl in next ch-2 sp, ch 2) 4 times, rep from * 4 more times, join — 36 2dc-cl, 30 ch-2 sp, 6 ch-3 corners.
Round 7: Sl st in next ch-sp, ch 2, 1 dc in same ch-sp, ch 3, 2dc-cl in same ch-sp, ch 2, (2dc-cl in next ch-2 sp, ch 2) 5 times, *[2dc-cl, ch 3, 2dc-cl] in next ch-3 sp, ch 2, (2dc-cl in next ch-2 sp, ch 2) 5 times, rep from * 4 more times, join — 42 2dc-cl, 36 ch-2 sp, 6 ch-3 corners.
Round 8: Sl st in next ch-sp, ch 2, 1 dc in same ch-sp, ch 3, 2dc-cl in same ch-sp, ch 2, (2dc-cl in next ch-2 sp, ch 2) 6 times, *[2dc-cl, ch 3, 2dc-cl] in next ch-3 sp, ch 2, (2dc-cl in next ch-2 sp, ch 2) 6 times, rep from * 4 more times, join — 48 2dc-cl, 42 ch-2 sp, 6 ch-3 corners.
Round 9: Sl st in next ch-sp, ch 2, 1 dc in same ch-sp, ch 3, 2dc-cl in same ch-sp, ch 2, (2dc-cl in next ch-2 sp, ch 2) 7 times, *[2dc-cl, ch 3, 2dc-cl] in next ch-3 sp, ch 2, (2dc-cl in next ch-2 sp, ch 2) 7 times, rep from * 4 more times, join — 54 2dc-cl, 48 ch-2 sp, 6 ch-3 corners.
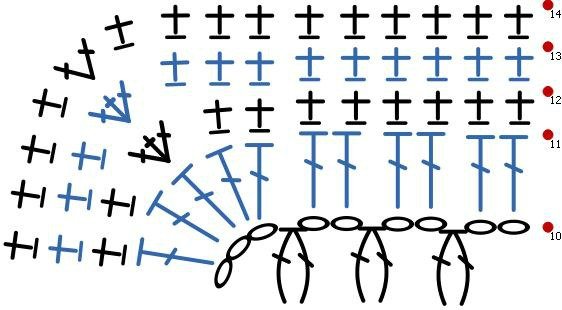
Round 10: Sl st in next ch-sp, ch 2, 1 dc in same ch-sp, ch 3, 2dc-cl in same ch-sp, ch 2, (2dc-cl in next ch-2 sp, ch 2) 8 times, *[2dc-cl, ch 3, 2dc-cl] in next ch-3 sp, ch 2, (2dc-cl in next ch-2 sp, ch 2) 8 times, rep from * 4 more times, join — 60 2dc-cl, 54 ch-2 sp, 6 ch-3 corners.
Round 11: Sl st in next ch-sp, ch 3, 1 dc in same ch-sp, work 2 dc in each ch-sp across to corner, work 5 dc in corner ch-sp, rep around, join and drop CA — 138 dc.
Round 12: Join CB in the back loop of same st as join, working in back loops only throughout round, work 1 sc in each of the next 2 sts, 3 sc in next corner st, *work 1 sc in each of the next 22 sts across, 3 sc in next corner st, repeat from * around, work 1 sc in each of the last 20 sts, join and drop CB — 150 sc.
Round 13: Join CA in the back loop of same st as join, working in back loops only throughout round, work 1 sc in each of the next 3 sts, 3 sc in next corner st, *work 1 sc in each of the next 24 sts across, 3 sc in next corner st, repeat from * around, work 1 sc in each of the last 21 sts, join and drop CA — 162 sc.
Round 14: Join CB in the back loop of same st as join, working in back loops only throughout round, work 1 sc in each of the next 4 sts, 2 sc in next corner st, *work 1 sc in each of the next 26 sts across, 2 sc in next corner st, repeat from * around, work 1 sc in each of the last 22 sts, join and fasten off CB — 168 sc.
Weave in ends.
Click here to reference Crochet Stitch Chart Symbols.
Joining
Lay out hexagons to form a ring as shown in the diagram below. We are going to be crocheting the hexagons together using a slip stitch along the edges indicated by the red lines. Be sure to leave one part open so you can fit it around your tree stand.
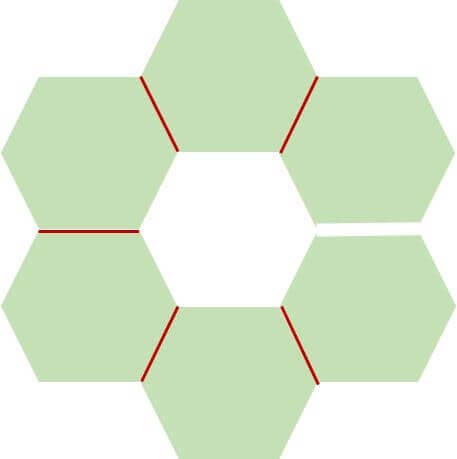
With right sides facing and using CB, slip stitch adjoining hexagons together through back loops only from corner stitch to next corner stitch, along one edge of facing hexagons. Repeat for each hexagon leaving beginning and ending hexagons unjoined.
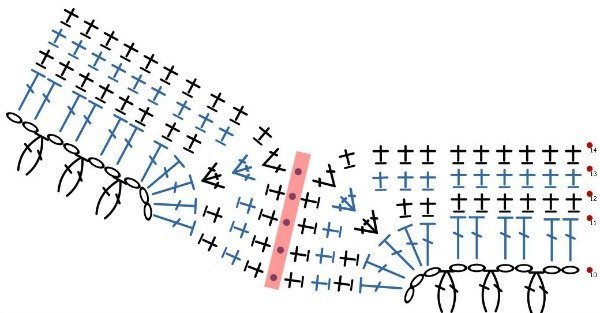
Inner Edging
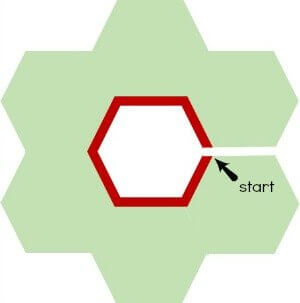
Row 1: With right side facing, join CB to inside corner of first hexagon as indicated by the arrow in the diagram above. Ch 1, working in back loops only for entire row, sc2tog, work 1 sc in each of the next 25 sts, sc3tog over last st of current hexagon, joining slip stitch, and first stitch of next hexagon, *work 1 sc in each of the next 26 sts, sc3tog, rep from * across, work 1 sc in each of the next 25 sts, 2sctog over last 2 sts, turn — 161 sc.
Row 2: Ch 1, 1 sc in next 25 sts, sc3tog, *1 sc in next 24 sts, sc3tog, rep from * across, 1 sc in last 25 sts, turn — 151 sc.
Row 3: Ch 1, sc2tog, work 1 sc in each of the next 22 sts, sc3tog, *1 sc in next 22 sts, sc3tog, rep from * across, 1 sc in next 25 sts, 2sctog, turn — 139 sc.
Row 4: Ch 1, 1 sc in next 25 sts, sc3tog, *1 sc in next 24 sts, sc3tog, rep from * across, 1 sc in last 25 sts, turn and fasten off CB — 129 sc.
Row 5: Join CA and ch 1, sc2tog, work 1 sc in each of the next 19 sts, sc3tog, *1 sc in next 18 sts, sc3tog, rep from * across, 1 sc in next 19 sts, 2sctog — 117 sc.
Fasten off and weave in ends.
Beginning/Ending of Rows
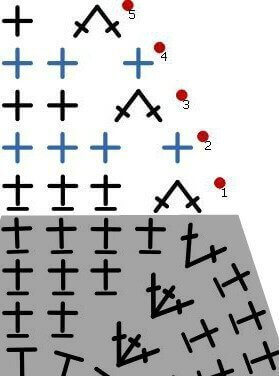
Inner Edging Adjoining Hexagon Decreases
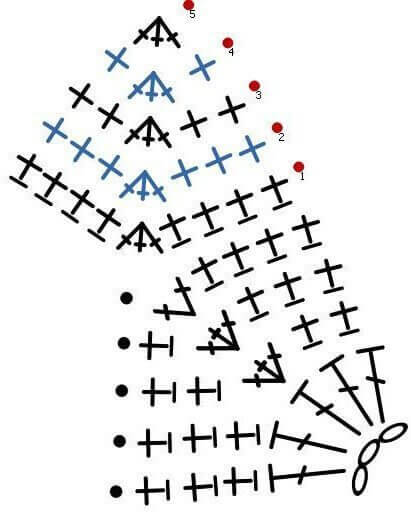
Outer Edging
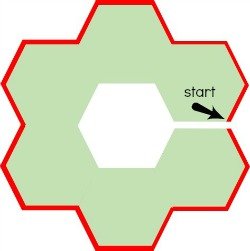
Row 1: With right side facing, join CB to outside corner of edge of first hexagon as indicated by the arrow in the diagram above. Ch 1, working in back loops only for entire row, work 1 sc in each of the next 83 sts, 3sctog over last st of current hexagon, joining slip stitch, and first stitch of next hexagon, *1 sc in next 82 sts, 3sctog, rep from * three more times, 1 sc in last 83 sts, turn — 499 sts.
Row 2: Ch 1, sc2 tog, *1 sc in next 25 sts, 2 sc in each of the next 2 sts, 1 sc in next 26 sts, 2 sc in each of the next 2 sts, 1 sc in next 25 sts, 3sctog, rep from * four more times, 1 sc in next 25 sts, 2 sc in each of the next 2 sts, 1 sc in next 26 sts, 2 sc in each of the next 2 sts, 1 sc in next 25 sts, sc2tog, turn — 511 sts.
Row 3: Ch 1, work 1 sc in each of the next 84 sts, 3sctog, *1 sc in next 82 sts, 3sctog, rep from * three more times, 1 sc in last 84 sts, turn — 501 sts.
Row 4: Ch 1, sc2 tog, 1 sc in next 25 sts, 2 sc in each of the next 2 sts, 1 sc in next 28 sts, 2 sc in each of the next 2 sts, 1 sc in next 24 sts, 3sctog, *1 sc in next 24 sts, 2 sc in each of the next 2 sts, 1 sc in next 28 sts, 2 sc in each of the next 2 sts, 1 sc in next 24 sts, 3sctog, rep from * four more times, 1 sc in next 24 sts, 2 sc in each of the next 2 sts, 1 sc in next 28 sts, 2 sc in each of the next 2 sts, 1 sc in next 25 sts, sc2tog, turn and fasten off CB — 513 sts.
Row 5: Join CA, ch 1, work 1 sc in each of the next 85 sts, 3sctog, *1 sc in next 82 sts, 3sctog, rep from * three more times, 1 sc in last 85 sts, turn — 503 sts.
Fasten off and weave in ends.
Outer Edging Adjoining Hexagon Decreases

Outer Edging Corner Increases
I hope you enjoyed this free crochet tree skirt pattern!! Click here for more Free Christmas Crochet Patterns.


I’m curious why you aren’t extending the finish edge to the layover edge. It would mean less edges to finish and more over lap of the split
Round 4 ,it says 2dc-vl in the next ch 2 space ( twice). Is that all in one ch2 space?
also having trouble with round 11… how do you get to 5 in the last corner??
HI. Thanks for posting this pattern. I am working on my first hexagon and I am stuck on round 11. If I follow the instructions, I only have 134 dc at the the end on the round. Seems like there are missing dc’s at the beginning of the round. Any advise?
I love this pattern! It is well written and easy to understand. The example pic is so beautiful! I am on round 11 and having the same problem.. I end up with less stitches and my hexagon is bunching.. When I try to trust the process and move forward (working on round 12), The bunching doesn’t get any better.. I have read and re-read the pattern, and am stuck. What am I missing?
Is your stitch count correct after Round 10? If so, it should come out correctly. 2 dc in each of the 54 chain spaces = 108, plus 5 dc in each corner should give you 138.
I was also having trouble. The problem is the instructions are wrong. At the beginning of round 10 after you slip stitch and chain 2, DC4 into the same space rather than DC1. This will given you your six corners and the required number of stitches,
The no of stitches counted on Row 11 doesn’t add up. Also, is there a chain 2 between 2 dc to the next. Is there a mistake in this 11th row as I’ve gone over Row 10 and is correct but not Row 11. Need your help. Thanks!
I did my chain 3 and added 4 dc all in the ch 3 space and it worked out better.
oh dear don’t know what my sister did wrong but its huge. It said use an I hook. I don’t know. I offered to take it apart and do it over with a smaller hook.
Approximately how big is each Hexagon? I’d like to use the hex pattern to make a 8 sided floor pouf and am looking for a large hex pattern. Hope this is it!
Thanks
Hi !! This is a great pattern.. I’m stitching mine together now… I’ve made 6 but it seems quite big using 6. And the picture you’ve posted seems to have only 5. Does your picture indeed have only 5 hexagons?
Hi Colleen 🙂 So glad you like it!! Making 6 makes this a perfect flat hexagon that can go around a tree stand so that the edges meet. If you want it to slightly cone in the center to go up the stand, you can use 5. Hope that helps!
What a great and simply idea. I’ll certainly crochet this Crochet Tree Skirt instead of using as usual some white tableclothes 🙂
Thank you for sharing is.