I’ve finally finished piecing all my colorful cluster burst squares together and wanted a crochet edging that would be just as colorful! If you missed my pattern for these little squares and would like to crochet up an afghan too, you can click here for the free pattern. I even have a tutorial here to guide you through joining them. Then make sure to come back and put the finishing touch on with this pretty crochet edging.
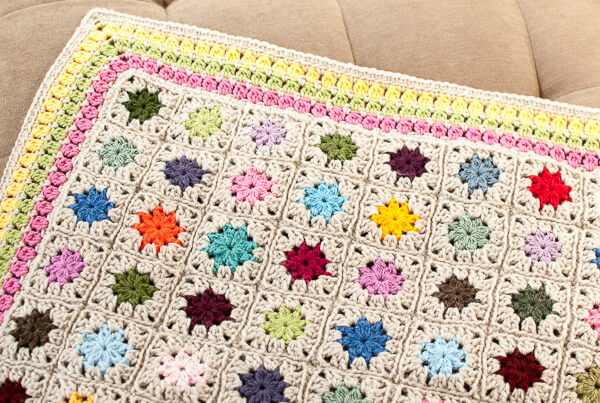
Cluster Burst Afghan Crochet Edging Pattern
Here’s what you need:
- your joined squares
- the color you used for Round 2 of your squares (CA), plus 3 coordinating colors of worsted weight yarn (CB, CC, CD)
- H hook
- tapestry needle and scissors
Resources and tutorials you may find helpful in following this free pattern: Crochet Abbreviations, U.S. to U.K. Crochet Conversion Chart.
Special Stitches:
Two double crochet cluster (2dc-cl): Yarn over, insert hook into specified stitch, yarn over and pull up loop, yarn over and pull through 2 loops on hook, repeat once more (3 loops will be on hook), yarn over and pull through all 3 loops on hook.
Three double crochet cluster (3dc-cl): Yarn over, insert hook into specified stitch, yarn over and pull up loop, yarn over and pull through 2 loops on hook, repeat 2 more times (4 loops will be on hook), yarn over and pull through all 4 loops on hook.
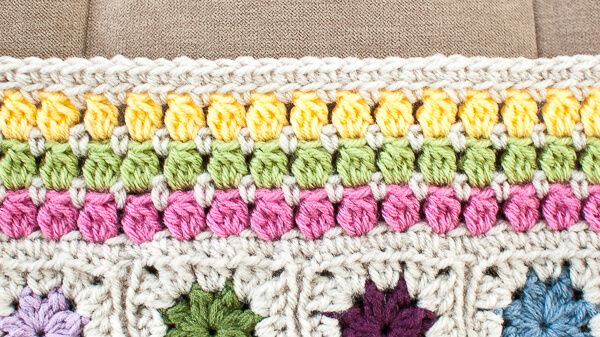
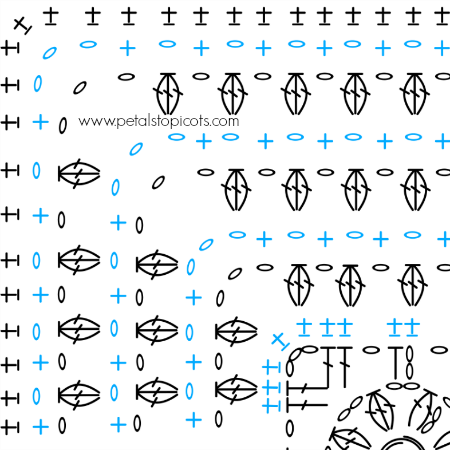
Round 1: Join CA in the back loop of the first dc following the ch-3 corner space, ch 1 (does not counts as st), beginning in the same stitch as yarn was joined and working in back loops only for this round, *work 1 sc in each of the next 2 sts, skip next ch-1 sp, work 1 sc in each of the next 2 sts, skip next ch-1 sp, work 1 sc in each of the next 2 sts, skip next ch and work 1 sc in the back loop of the second corner ch of the current square and the next square, skip next ch-sp, rep from * across edge until corner square, work 1 sc in each of the next 2 sts on corner square, skip next ch-1 sp, work 1 sc in each of the next 2 sts, skip next ch-1 sp, work 1 sc in each of the next 2 sts, work 1 sc in each of the next 3 chains around corner, rep from * around, join and fasten off CA.
Round 2: Join CB in same st as join, ch 2 and work 1 2dc-cl in same st as join, ch 1, skip next st, *work 1 3dc-cl in next st, ch 1, skip next st, rep from * across edge to corner, *work 1 3dc-cl in first corner st, ch 3, work 1 3dc-cl in next corner st, skip next last corner st, rep from * around, join and fasten off CB.
Round 3: Join CA in any ch-1 sp along edge, ch 1 (does not count as st), work 1 sc in same ch-sp as yarn was joined, ch 1, skip next st, *work 1 sc in next ch-sp, ch 1, skip next st, rep from * to corner, work [1 sc, ch 3, 1 sc] in corner ch-3 sp, rep from * around, join and fasten off CA.
Round 4: Join CC in any ch-1 sp along edge, ch 2 and work 1 2dc-cl in same sp as join, ch 1, skip next st, *work 1 3dc-cl in next ch-1 sp, ch 1, skip next st, rep from * across edge to corner, *work [1 3dc-cl, ch 3, 1 3dc-cl] in corner ch-3 sp, ch 1, skip next st, rep from * around, join and fasten off CC.
Round 5: Join CA in any ch-1 sp along edge, ch 1 (does not count as st), work 1 sc in same ch-sp as yarn was joined, ch 1, skip next st, *work 1 sc in next ch-sp, ch 1, skip next st, rep from * to corner, work [1 sc, ch 3, 1 sc] in corner ch-3 sp, rep from * around, join and fasten off CA.
Round 6: Join CD in any ch-1 sp along edge, ch 2 and work 1 2dc-cl in same sp as join, ch 1, skip next st, *work 1 3dc-cl in next ch-1 sp, ch 1, skip next st, rep from * across edge to corner, *work [1 3dc-cl, ch 3, 1 3dc-cl] in corner ch-3 sp, ch 1, skip next st, rep from * around, join and fasten off CD.
Round 7: Join CA in any ch-1 sp along edge, ch 1 (does not count as st), work 1 sc in same ch-sp as yarn was joined, ch 1, skip next st, *work 1 sc in next ch-sp, ch 1, skip next st, rep from * to corner, work [1 sc, ch 3, 1 sc] in corner ch-3 sp, rep from * around, join in back loop of first st of round.
Round 8: Ch 1 (does not count as st), working in back loops only for this round, work 1 sc in same st as join, *work 1 sc each ch-sp and in each st across to corner, work 1 sc in first ch of ch-3 corner sp, work 3 sc in next ch, work 1 sc in last ch, rep from * around around, join and fasten off.
Weave in ends.
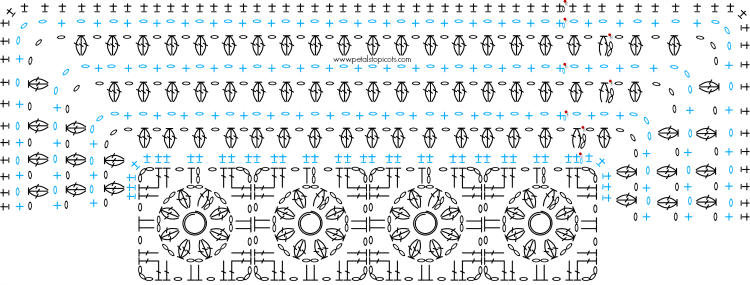
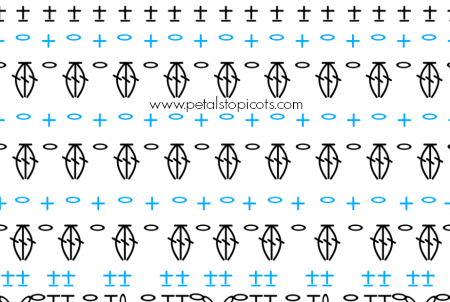
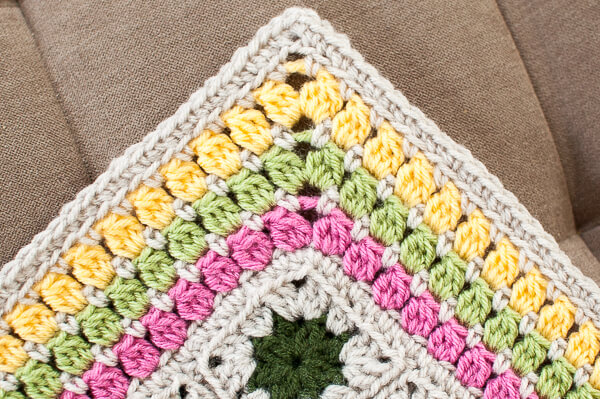
Feel free to share your beautiful afghans on my Facebook group here or check out other Scrapghan ideas here.


Lovely pattern but I’m having the same problem as Jo. With skipping a stitch on the first round, the Afghan is curling. I’m on round 5 and the Afghan is not laying flat.
Thanks in advance.
Kate
j aime beaucoup votre site et vos patron de crochet merci et bravo
I love this afghan. I just finished putting my squares together and have crocheted my first round of the edging. The issue I’m having is, by skipping the chain space, my edging is coming out smaller than the afghan and the edges are curling up. Are the directions correct? How can my edge come out the same size as afghan when I’m skipping the chain space all the way around? Thank you!
Correction: the corners are curling up not the edges.
Hi Jo 🙂 Are you working 1 sc in each of the 3 chains around corner?
Could you please post the pattern for the cluster burst afghan granny square. I can’t seem to find it on your site and would love to make this afghan but need the pattern for the squares. Thank you, marilyn
Sure, Marilyn … here is the link to the squares 🙂 http://www.petalstopicots.com/2014/06/cluster-burst-granny-square-pattern/
This is gorgeous! I love the edging and the colors you selected for this blanket.
http://divinedebrisjewelry.wordpress.com/
http://www.divinedebris.com
Thank you for sharing this lovely blanket.
I love this edges …. It gives the blanket the final touch 🙂
This is a gorgeous blanket and now on my list.
Thank you for making it so easy to print/store your patterns as a PDF.
OOOOH! I love that edging! It’s absolutely beautiful. I think that’s one of the most simple but beautiful afghans I’ve seen! Thanks so much for sharing.
Hi Kara, It’s looking very lovely!!:) thanks for sharing!!
How do you draw the chart/pattern? I have tried with PowerPoint but it’s very difficult .