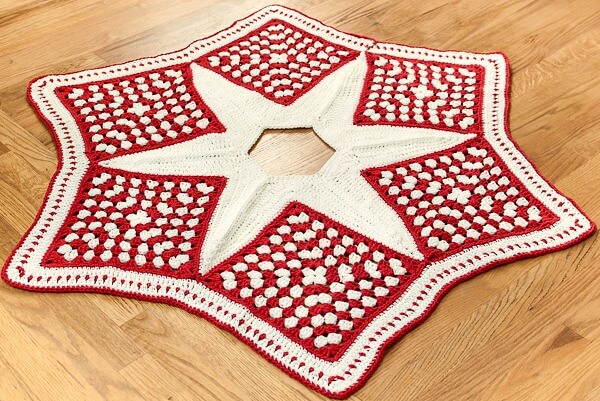
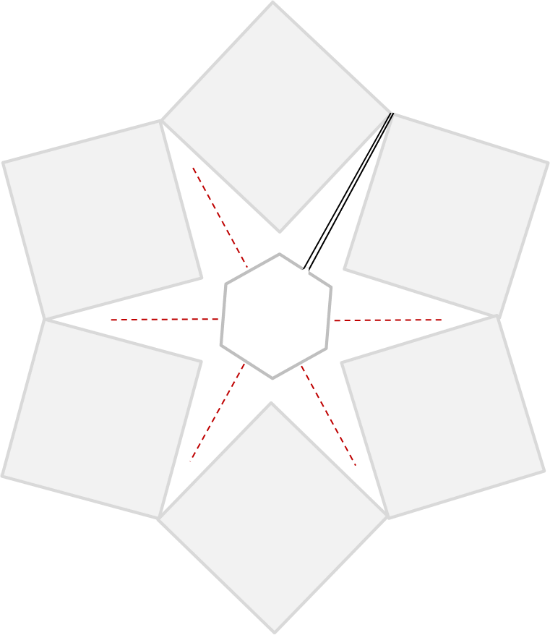
Are you ready to continue on with our Crochet Christmas Tree Skirt Pattern?! This week we are going to work on our center star. Hopefully you’ve all made the large grannies from Part 1 that I shared last week. If not, you can find that part of the pattern here. After attaching them all as described in the last post, it should look like this. Note the green arrow pointing to the square all the way on your right … that is where we are going to join our yarn for Row 1.

The Star
Note: The inside star is worked completely facing right side. Do not turn your work after each row; instead, fasten off and rejoin yarn where indicated in the square all the way to the right.
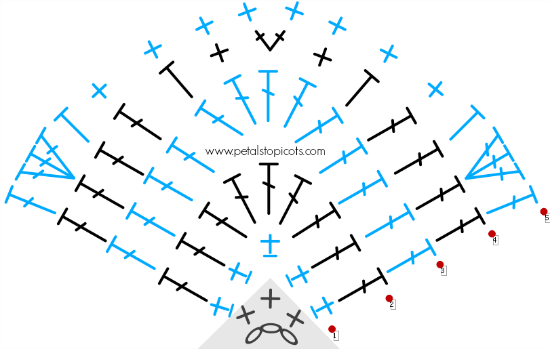
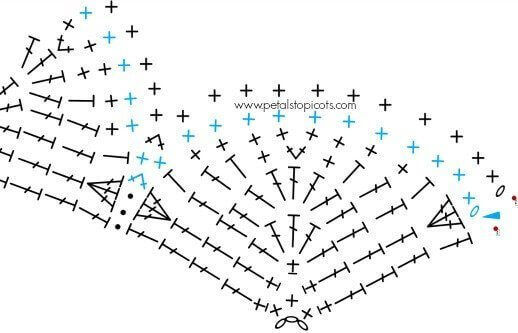
Row 1: Start with the square all the way on the right, join white yarn in the back loop of the last sc in the corner ch-3 sp (see green arrow in schematic above or blue arrow in Diagram A below), ch 1 (does not count as st here and throughout), working in back loops only across row, *work 1 sc in each of the next 32 sts, work 3 sc in corner st, work 1 sc in each of the next 32 sts, work a sc2tog in the first sc in the corner ch-3 sp of the current square and the last sc in the corner ch-3 sp of the adjoining square (see Diagram C below), rep from * across next 4 squares, work 1 sc in each of the next 32 sts, work 3 sc in corner st, work 1 sc in each of the next 32 sts, Sl st in next st and fasten off leaving last stitches of previous row unworked.
Row 2: Join white yarn in the 3rd sc from previous row, ch 1, *work 1 sc in each of the next 10 sts, work 1 hdc in next 10 sts, work 1 dc in next 10 sts, work 5 dc in corner st, work 1 dc in next 10 sts, work 1 hdc in next 10 sts, work 1 sc in each of the next 10 sts, Sl st in next st, skip next 5 sts, Sl st in next st, rep from * across next 4 squares, work 1 sc in each of the next 10 sts, work 1 hdc in next 10 sts, work 1 dc in next 10 sts, work 5 dc in corner st, work 1 dc in next 10 sts, work 1 hdc in next 10 sts, work 1 sc in each of the next 10 sts, Sl st in next st and fasten off leaving last stitches of previous row unworked.
Row 3: Join white yarn in the 3rd sc from previous row, ch 1, *work 1 sc in each of the next 10 sts, work 1 hdc in next 10 sts, work 1 dc in next 10 sts, work 5 dc in corner st, work 1 dc in next 10 sts, work 1 hdc in next 10 sts, work 1 sc in each of the next 10 sts, Sl st in next st, skip next 4 sts, Sl st in next st, rep from * across next 4 squares, work 1 sc in each of the next 10 sts, work 1 hdc in next 10 sts, work 1 dc in next 10 sts, work 5 dc in corner st, work 1 dc in next 10 sts, work 1 hdc in next 10 sts, work 1 sc in each of the next 10 sts, Sl st in next st and fasten off leaving last stitches of previous row unworked..
Row 4: Join white yarn in the 3rd sc from previous row, ch 1, *work 1 sc in each of the next 6 sts, work 1 hdc in next 7 sts, work 1 dc in next 15 sts, work 1 hdc in next st, work 1 sc in next st, work 2 dc in corner st, work 1 sc in next st, work 1 hdc in next st, work 1 dc in next 15 sts, work 1 hdc in next 7 sts, work 1 sc in each of the next 6 sts, Sl st in next st, skip next 4 sts, Sl st in next st, rep from * across next 4 squares, work 1 sc in each of the next 6 sts, work 1 hdc in next 7 sts, work 1 dc in next 15 sts, work 1 hdc in next st, work 1 sc in next st, work 2 dc in corner st, work 1 sc in next st, work 1 hdc in next st, work 1 dc in next 15 sts, work 1 hdc in next 7 sts, work 1 sc in each of the next 6 sts, Sl st in next st and fasten off leaving last stitches of previous row unworked.
Row 5: Join white yarn in the 3rd sc from previous row, ch 1, *work 1 sc in each of the next 12 sts, work 1 hdc in next 10 sts, work 1 dc in next st, work 3 dc in next st, work 1 hdc in next st, work 1 sc in next 8 sts, work 1 hdc in next st, work 3 dc in next st, work 1 dc in next st, work 1 hdc in next 10 sts, work 1 sc in each of the next 12 sts, Sl st in next st, skip next 4 sts, Sl st in next st, rep from * across next 4 squares, work 1 sc in each of the next 12 sts, work 1 hdc in next 10 sts, work 1 dc in next st, work 3 dc in next st, work 1 hdc in next st, work 1 sc in next 8 sts, work 1 hdc in next st, work 3 dc in next st, work 1 dc in next st, work 1 hdc in next 10 sts, work 1 sc in each of the next 12 sts, Sl st in next st and fasten off leaving last stitches of previous row unworked.
Diagram A. Row Starts
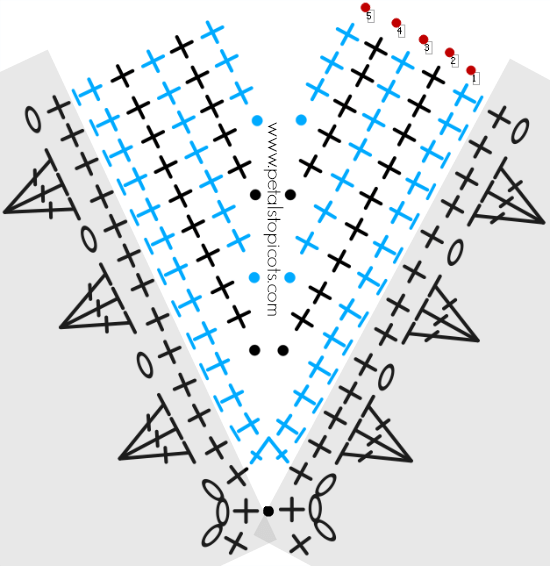
Diagram B. Peaks
Diagram C. Valleys
Close up star: Folding first 2 squares over each other with wrong sides facing each other, join white yarn in the back loops of the adjacent scs at the bottom of each “valley”, Sl st together in back loops of next 24 adjacent scs (last Sl st should be in the 2nd dcs of the 3-dc groupings from Row 5; see red dashed line below for reference), fasten off. Repeat for each of the next 4 “valleys”.
Row 6: Starting again with the square all the way to the right, join white yarn to 2nd dc of the first 3-dc grouping (see arrow in stitch Diagram D. below), ch 1, work 1 sc in same st as join and each of the next 11 sts, *sc2tog in first dc of the 3 dc grouping below of the current piece and the last dc of the 3 dc grouping below of the adjoining piece (see Diagram D below), work 1 sc in each of the next 10 sts, repeat from * four more times, work 1 sc in each of the next 2 sts, fasten off.
Row 7: Starting again with the square all the way to the right, join white yarn in first st of Row 6, ch 1, work 1 sc in same st as join and each of the next 10 sts, *sc2tog, work 1 sc in each of the next 8 sts, rep from * across, work 1 sc in each of the last 2 sts, fasten off.
Weave in ends.
Diagram D. Center Finishing
We’re almost done! All that’s left is the edging and then you are ready to start your Christmas decorating. Feel free to show off your work on my Facebook page or Ravelry … I would love to see your projects!
← Crochet Christmas Tree Skirt Pattern — Part 1: The Grannies



Am I missing something is there a Part three for the border all round this beautiful tree skirt?
You posted this a couple of years ago and I am sorry to say I’ve only just found it so I may have to do my own thing .
Thank you and best wishes
I have found an issue with rows 3 and on of the second part. You say in the pattern to join in the 3rd sc of the previous row, but according to your diagram it should be in the 2nd sc (since you state at the beginning that the ch1 at the beginning of each row does not count as a st). Only tripped me up for a minute, but thought you should know. Thank you for this beautiful pattern, I am thoroughly enjoying it!
Since the ch1 does not count as a stitch, you should only be counting the first 3 SC. Therefore you would be joining in the 4th worked stitch which is the 3rd sc. No error in the pattern, only in interpretation, I think.
Hi Kara. Love the pattern! Question though. Since I have 6 granny sqares shouldn’t I be following the star instructions from the * for the next 5 squares not 4?
Hello 🙂 For that particular repeated part it would only be for the next 4 squares. The pattern for the sixth square comes right after the asterisked portion. Make sense?
There’s a typo just above this comments section. Instead of saying: .part 3 The Edging, it says part 2. It only gave me a moment of confusion, but no biggy. Although, I thought you might like to know. Thanks for all the wonderful patterns. You’re an amazing designer AND your patterns are very well written. 🙂
Good catch! I corrected it now. Thanks for letting me know 🙂
I was so excited to get this part of the pattern I’m already done. Now I have to wait another week :/
Yay!! I am so glad to hear that!
I absolutely LOVE this pattern! You are such a talented designer and wonderful writer of patterns!
Thank you, Marilyn 🙂
I am so excited to have the second part of the instructions! Thank you so much for sharing this great pattern. Crochet on!
Thanks, Theresa!!
Oh wow, Kara!! That’s superb 🙂
I liked the way you have meticulously written the pattern and especially the diagram for this doesn’t look an easier task. Well done and thanks for sharing!!
I don’t celebrate Christmas but for sure this can be a great decor piece. I mostly make decor items.
Thanks so much, Preeti 🙂