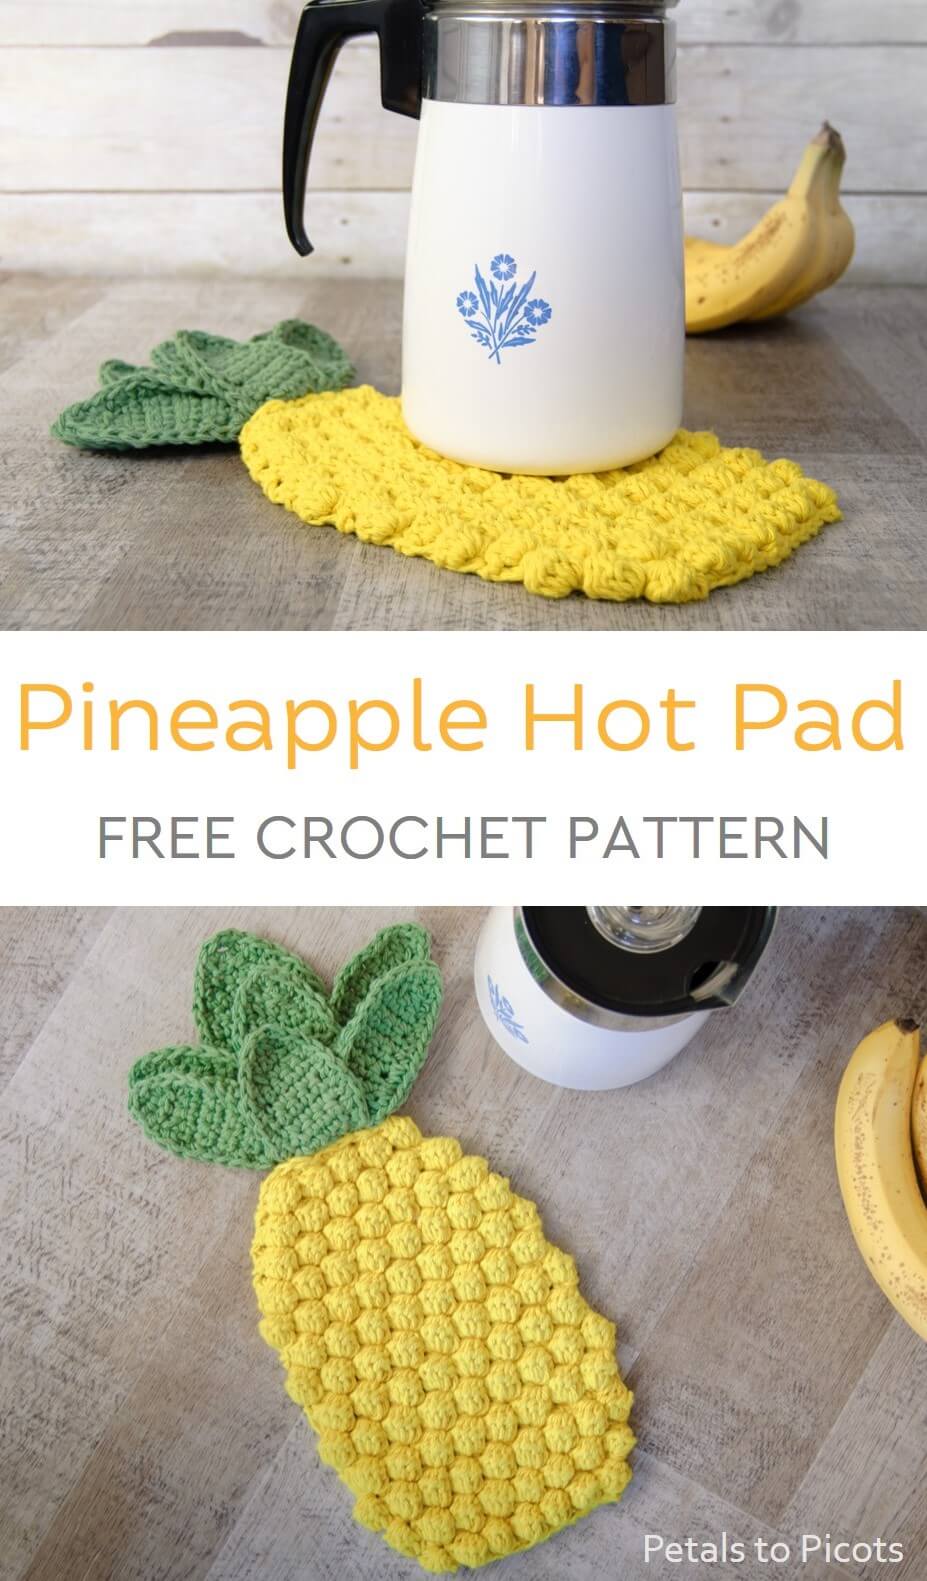
This pineapple crochet hot pad pattern makes for an easy and portable project as well as a bright and cheery addition to your decor. The pineapple has long been using as an expression of welcome and a symbol of hospitality and friendship. What better adornment for your dining table or to gift to a friend!
The cluster stitches used in this hot pad pattern produce a beautifully thick and textured fabric that is perfect for protecting your table from hot dishes. For extra protection, you can use an insulating fabric such as Insul-Bright to line the bottom of the hot pad, however I have not found that necessary for these.
I stitched mine up in with two colors of worsted weight cotton. Cotton yarn is a must when making crochet hot pads or pot holder patterns. Synthetic yarns like acrylic can melt when a hot dish is placed on it ruining not only your hot pad but possibly your table as well!
Pineapple Hot Pad
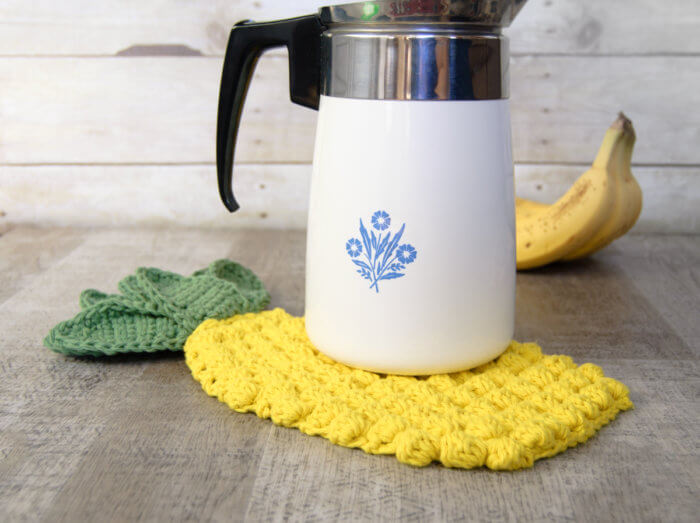
Pineapple Crochet Hot Pad Pattern
Here is what you will need:
- two colors cotton yarn approximately 120 yds of yellow and 75 yds of green (shown here in Lion Brand 24/7 Cotton® in the Grass #172 and Lemon #157 colorways)
- US H-8 / 5 mm crochet hook
- yarn needle and scissors for finishing
Finished hot pad measures approximately 15 in. from bottom of pineapple to top of leaves.
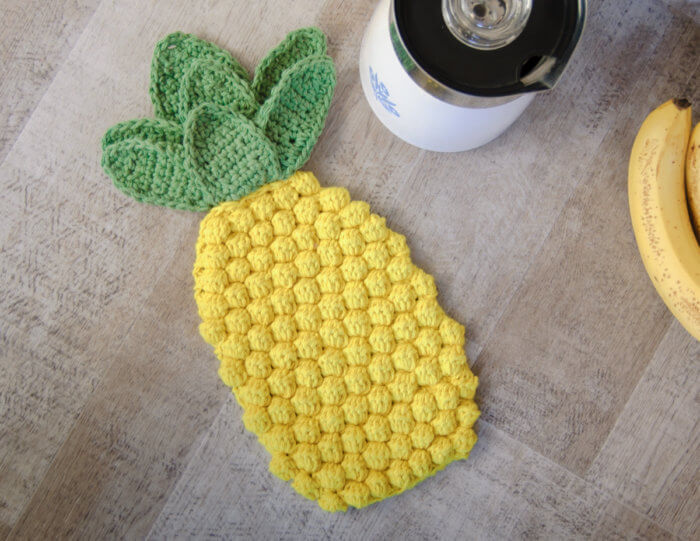
This free pattern is written in U.S. crochet terms and abbreviations. Stitch counts are provided at the end of each round to help you keep on track.
Resources and tutorials you may find helpful in following this pattern: Crochet Abbreviations, U.S. to U.K. Crochet Conversion Chart.
Pineapple hot pad Body
Special Stitch: 5 Double Crochet Cluster (5dc-cl) – yarn over and insert hook in specified stitch, yarn over and bring up a loop, yarn over again and pull through 2 loops on hook (2 loops remain on hook), *yarn over and insert hook in same stitch, pull up a loop, yarn over and pull through 2 loops, repeat from * 3 more times (6 loops on hook), yarn over and pull through remaining loops.
Add this pattern to your Ravelry library.
With yellow yarn, chain 14.
Row 1: Work 1 single crochet in second chain from hook and in each chain across, turn — 13 sc.
Row 2: Ch 1 (does not count as stitch here and throughout), work 5dc-cl in first stitch, *sc in next stitch, 5dc-cl in next stitch, repeat from * across, turn — 7 cluster stitches, 6 sc.
Row 3: Ch 1, work 2 sc in first stitch, work 1 sc in next stitch and in each stitch across until the last, work 2 sc in last st, turn — 15 sc.
Row 4: Repeat Row 2 — 8 cluster stitches, 7 sc.
Row 5: Repeat Row 3 — 17 sc.
Row 6: Repeat Row 2 — 9 cluster stitches, 8 sc.
Row 7: Ch 1, work 1 sc in each stitch across, turn — 17 sc.
Row 8: Ch 1, work 1 sc in first stitch, *5dc-cl in next stitch, 1 sc in next stitch, repeat from * across, turn — 8 cluster stitches, 9 sc.
Row 9: Ch 1, work 1 sc in each stitch across, turn — 17 sc.
Row 10: Ch 1, work 5dc-cl in first stitch, *sc in next stitch, 5dc-cl in next stitch, repeat from * across, turn — 9 cluster stitches, 8 sc.
Rows 11 through 18: Repeat Rows 7 through 10 twice.
Rows 19 and 20: Repeat Rows 7 and 8. .
Row 21: Ch 1, sc2tog, work 1 sc in next stitch and in each stitch across until the last 2 stitches, sc2tog, turn — 15 sc.
Row 22: Ch 1, work 1 sc in first stitch, *5dc-cl in next stitch, in next stitch, repeat from * across, turn — 7 cluster stitches, 8 sc.
Row 23: Repeat Row 21 — 13 sc.
Row 24: Repeat Row 22 — 6 cluster stitches, 7 sc.
Row 25: Repeat Row 21 — 11 sc.
Row 26: Repeat Row 22 — 5 cluster stitches, 6 sc.
Row 27: Repeat Row 21 — 9 sc.
Fasten off, weave in ends.
Pineapple Leaves
Leaf A (make 1)
With green yarn, chain 8.
Row 1: Work 1 sc in second chain from hook and each chain across — 7 sc.
Rows 2 through 13: Ch 1, work 1 sc in each stitch across, turn — 7 sc.
Row 14: Ch 1, sc2tog, work 1 sc in each of the next 3 sts, sc2tog, turn — 5 sc.
Row 15: Ch 1, sc2tog, work 1 sc in next st, sc2tog, turn — 3 sc.
Row 16: Ch 1, sc3tog — 1 sc.
Edging: Work a sc edging evenly around leaf, working 3 scs in top point and bottom corners.
Fasten off.
Leaf B (make 4)
Chain 5.
Row 1: Work 1 sc in second chain from hook and each chain across — 4 sc.
Rows 2 through 10: Ch 1, work 1 sc in each stitch across, turn — 4 sc.
Row 11: Ch 1, sc2tog twice, turn — 2 sc.
Row 12: Ch 1, sc2tog — 1 sc.
Edging: Work a sc edging evenly around leaf, working 3 scs in top point and bottom corners.
Fasten off.
Leaf C (make 1)
Chain 6.
Row 1: Work 1 sc in second chain from hook and each chain across — 5 sc.
Rows 2 through 9: Ch 1, work 1 sc in each stitch across, turn — 5 sc.
Row 10: Ch 1, sc2tog, 1 sc in next, sc2tog, turn — 3 sc.
Row 11: Ch 1, sc3tog — 1 sc.
Edging: Work a sc edging evenly around leaf, working 3 scs in top point and bottom corners.
Fasten off.
Leaf D (make 1)
Chain 6.
Row 1: Work 1 sc in second chain from hook and each chain across — 5 sc.
Rows 2 through 7: Ch 1, work 1 sc in each stitch across, turn — 5 sc.
Row 8: Ch 1, sc2tog, 1 sc in next, sc2tog, turn — 3 sc.
Row 9: Ch 1, sc3tog — 1 sc.
Edging: Work a sc edging evenly around leaf, working 3 scs in top point and bottom corners.
Fasten off.
Leaf Assembly
Step 1: Place Leaf A down and place a Leaf B over each side tilting slightly outward. Slightly fold over the bottom corners of each of the Leaf Bs as shown below. Using a tapestry needle and green yarn (a tail from one of the leaves works great for this!), stitch across the bottom through all leaves to secure.
Step 2: Place Leaf C on top of previous leaves making sure bottoms are aligned. Use a yarn needle and green yarn to stitch across the bottom to secure.
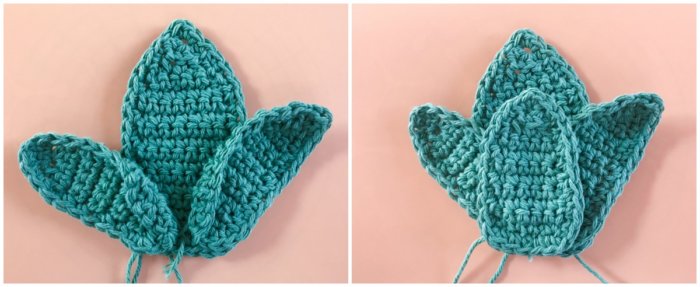
Step 3: Place a Leaf B over each side tilting slightly outward. Slightly fold over the bottom corners of each of the Leaf Bs as shown below. Using a tapestry needle and green yarn, stitch across the bottom through all leaves to secure
Step 4: Place Leaf D on top of previous leaves making sure bottoms are aligned. Use a yarn needle and green yarn to stitch across the bottom to secure.
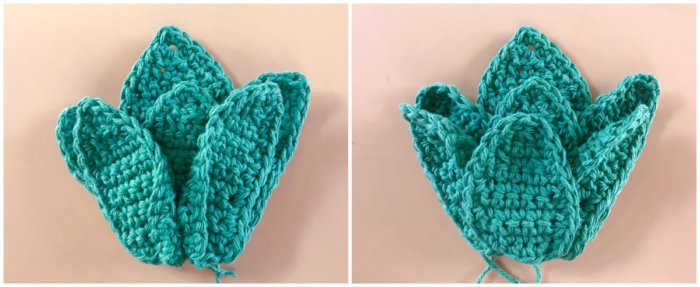
← Step 3 and Step 4 →
Finishing
Fasten off, weave in ends. Using a yarn needle and yellow yarn, stitch leaves to wrong side of pineapple body.
OTHER PROJECTS YOU MAY ENJOY:
Find more free crochet kitchen patterns here.


Crocheted this in a short time. Wonderful pattern, well written. Thank you!
Sue
Came out perfectly, my mom will love it! Thank you!!
I printed out the pattern and carefully followed the instructions and it worked out just fine! I plan on crocheting a few more. Thank you for the free and lovely pattern.
I don’t understand what sc2tog means in row 21. Never heard of it.
Single crochet 2 together. Also called a decrease in some patterns
I’m finding some of the same issues. Left side flows nicely. Right side looks almost zig zag. The row count is exact. Maybe alternating from 8 to 9 clusters is the problem 🤷🏻♀️
Very cute. The cluster stitch is perfect for a trivet. Do you have other trivet patterns that use the cluster stitch? Perhaps a large autumn leaf!
I’m having a problem with row 22. When j count the clusters it’s not 7. It doesn’t even add up to 7 clusters. It also say 5dc-cl in next stitch in next stitch. So I’m confused.
My leaves don’t look like yours can you do a video for us please
You need to make a video of the pineapple hot pad for us all
This pattern worked great! Thank you so much <3
Thanks for the pattern, I love the look of how yours turned out. Unfortunately, like many others, I’m not getting the same results. The cluster stitches on the right side that are on the most outside are flat. The right side is also a little looser than the left despite closely watching to my tension. I’ve restarted this project six times now. I tried leaving out the ch1 on sc rows and it doesn’t seem to help.
Definitely having a rough time with this pattern (and I am not a beginner). Ripped out partially twice and completely another two times. I think the pattern is screwy. Something going wrong at row 8-10ish? The stitches on the right side of the pineapple start in about an inch to the left of the outer most stitches below that point. And no it’s not my count or tension.
At the end of row 2 it says I should have 7 stitches (7 dc-cl), the it shows 6 sc (single crochets) before we turn. Where do the 6 single crochets go?
Don’t give up on this pattern! I am a near beginner–I taught myself with Youtube videos and have been at it for about only two months. I ripped it apart about three times before I started to understand where I was going wrong, but it was worth it. The final product is cute. When you finish, you may need to stretch or wet post it to shape it the way you want it. I am sending mine to a friend who lives in South Carolina it turned out so well.
I’m glad I’m not the only one having a wonky time. I’ve taken it out more than I’d like to but that’s the game I guess.
I like to follow a pattern that says all the ROWS instead of SEE ROW ABOVE blah blah blah to continue so not to get mixed up. It’s just easier for beginners.
I found the patter very easy to follow and it came out nicely on both my first and second time… made two for my sister
. Thank you for the pattern! I do have one question … the leaves are floppy … did you tack them to keep them laying flat?
I’m so happy to hear that, Patty!!
I found it worked if I started with a chain of 15 and put a single crochet after that last 5dc cluster.Ialso had to adjust my count on the rows of single crochets.
im having an issue with my one end too . Yes wonky!! I wish you would make a video I love this little hot pad. I already pulled out twice 🙁
Hi Judy 🙂 Which side is the problem on? I’ve been playing around with the pattern and trying to figure out why that would be.
Its the right side. Maybe its me. It just doesn’t pop like the left side .. the last puff stitch. Im going to pull it out again and try again.. After that I might just move on 🙁 i wanted to make for my daughter she loves pineapples. I wish there was a video, I do so much better with a visual. :[
I’ve been playing around with this pattern. Let’s see if this helps … the issue could be a difference in tension with the ch 1 at the beginning of the single crochet rows. If you eliminate it and just start working your single crochets as directed, does it correct the wonky-ness?
I’m having a problem with the pineapple looking wonky on one side. The pattern needs review, I think.
Hmmm … I’m not sure why that would be. Are your stitch counts correct for each row?
My one side is wonky as well. I’ve already pulled it twice too. Not sure what is going on. 2nd time I counted the stitches twice.
I’ve been playing around with this pattern. Let’s see if this helps … the issue could be a difference in tension with the ch 1 at the beginning of the single crochet rows. If you eliminate it and just start working your single crochets as directed, does it correct the wonky-ness?
If you add a single crochet after the last 5dc in the row it makes it work out.
In the same stitch?
I’ve started it only time will tell if I can actually do it. I agree with comments about showing every row instead of saying go back. and repeat a different row. I use a row counter and it makes me loose my row I’m actually on. The pattern is on YouTube by someone else but I had a hard time copying it to paper and I prefer patterns on paper. Sue USA
Me too. Doesn’t look good. Going to frog for the third time 🙃
I’ve been playing around with this pattern. Let’s see if this helps … the issue could be a difference in tension with the ch 1 at the beginning of the single crochet rows. If you eliminate it and just start working your single crochets as directed, does it correct the wonky-ness?
Please review this pattern. I did not read it all the way through, but it appears as though there are some errors.
I believe Row 8 of the body should say *5dc-cl in next stitch, 1sc in next…..
Rows 11-18 say to repeat 7-10. I assume you repeat twice.
Rows 23-27 all say to repeat Row 21, but there are different stitch counts at the ends of these rows.
I gave up at this point.
It is a cute hot pad & I hope to make one.
Hello 🙂 Yes, Row 8 is correct … the change in sequence is because now we are decreasing. As for Rows 11-18, yes, you do repeat Rows 7-10 twice ending with row 18. As for Rows 23-27, it should be alternating between repeating Rows 21 and 22; since these are decreasing rows, that is why I included the new end stitch counts. I hope you will give it another try. Good luck!!