You don’t need a lot of money, time, or even crochet experience to create a special blanket to give as a gift or to donate to a child in need. These quick and easy crochet edging patterns add a handmade touch to any fabric blanket. Choose from the patterns included here or check out all my Crochet Borders & Edging Patterns here.
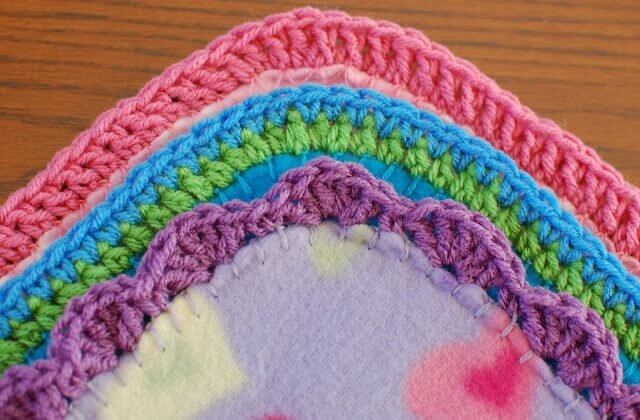
Add a Crochet Edging to Fabric
To start, pick out a fabric blanket, such as fleece, flannel, or even a receiving blanket. Many craft stores like Michaels and Joann Fabric carry small fleece blankets at very reasonable prices. The easiest approach is to find a blanket that already has stitching around it for you to crochet into but you can also easily add your own blanket stitching around the fabric or use a tool to crochet directly into the fabric.
Crocheting a Border on Fabric with Blanket Stitching
Many fabric blankets already come with an edge of blanket stitching around them (Fig. 1a and 1b). You can start crocheting right into that stitching by inserting your hook through the top of the blanket stitch and pulling up a loop (Fig. 1c), then crochet your edging as usual (Fig. 1d). Scroll down to choose a crochet edging pattern.


Adding Your Own Blanket Stitching
If your fabric or blanket does not have a blanket stitch around it, you can easily stitch one on yourself with a needle and crochet thread as I did here for these pretty tea towels. You can follow this tutorial for How To Do a Blanket Stitch or you can use a sewing machine.
You can also crochet a blanket stitch border right into the fabric by using a special tool, such as a Sharp Crochet Hook or an Edgit Piercing Hook to add the stitching. If you already have a rotary cutter at home, you could also use a skip blade attachment specially made for crocheted edgings.
For this tutorial, I am using a sharp pointed crochet hook (Fig. 2a). To add a blanket stitch, use a coordinating color of crochet thread or separate strands from the yarn you plan to use for the border. Insert the hook into the fabric, and pull up a loop of the thread to the height of the edge of the blanket (Fig. 2b). Then, yarn over and pull through both loops on hook (Fig. 2c). Continue around your fabric until you have a stitched border to crochet into. Then scroll down to choose a crochet edging pattern.


Quick and Easy Crocheted Blanket Edging Patterns

This free pattern is written in U.S. crochet terms and abbreviations. Stitch counts are provided at the end of each round to help you keep on track.
Resources and tutorials you may find helpful in following this pattern: Crochet Abbreviations, U.S. to U.K. Crochet Conversion Chart.
Add these patterns to your Ravelry library.
Basic Border
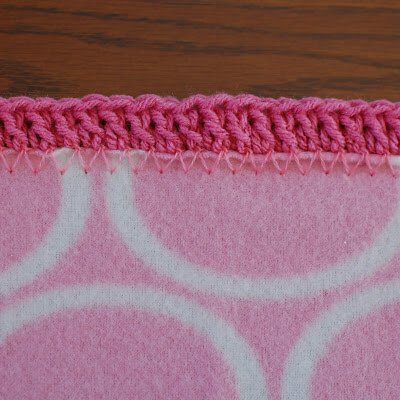
Join yarn to blanket by inserting your hook through a stitch and pulling up a loop (see Fig. 1c above).
Ch 3, work 1 dc in each st until you reach the corner. For rounded corners, work 2 dc in the three corner stitches. For straight corners, work 5 dc in the corner st. Continue working around blanket. Join with a Sl st in the top of the beginning ch-3.
Fasten off, weave in ends.
Two-Round Design
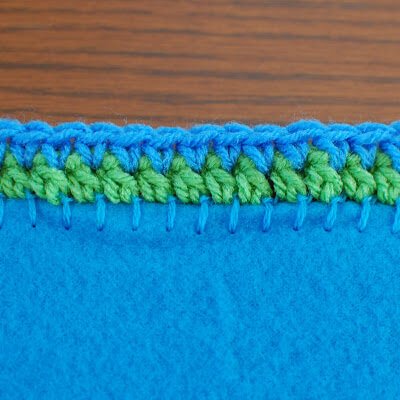
Join yarn as above. Ch 2. Round 1: Work 1 hdc in each stitch until you reach the corner. For rounded corners, work 2 hdc in the three corner stitches. For straight corners, work 3 dc in the corner st. Continue working around blanket. Join with a Sl st in the top of the beginning ch-2.
Round 2: Ch 1, work 1 sc between each hdc around blanket, continue the same around each corner. Join with a Sl st in 1st sc.
Fasten off, weave in ends.
Shell Border / Scalloped Border
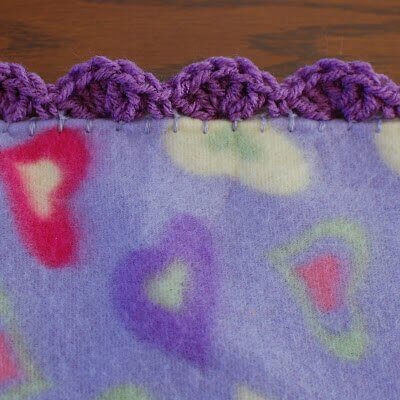
Join yarn as above.
Ch 1.
Work 1 sc in same stitch as loop was pulled up, sk next st, 5 dc in next, sk next st, *1 sc in next, sk next st, 5 dc in next, sk next, rep from * around, ending with a Sl st in 1st sc (depending on how many stitches are around the blanket, you may need to improvise toward the end by perhaps skipping 2 sts or none at all to make the join work properly).
Fasten off, weave in ends.
Little Spaces Edging
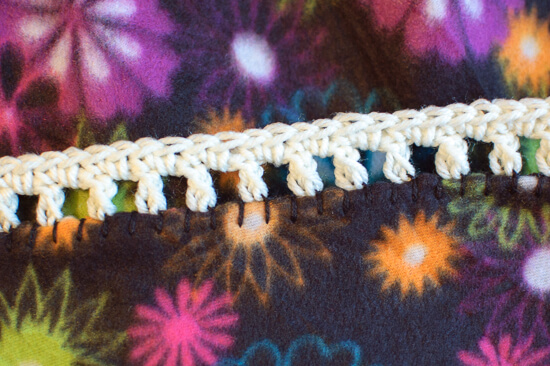
I have shared this simple edging pattern before but it is worth including here as well.
Join yarn as above.
Round 1: Ch 4 (counts as 1 dc and 1 ch), skip next blanket stitch, *1 dc in next blanket stitch, ch 1, skip next blanket stitch, rep from * around, working [1 dc, ch 1, 1 dc], ch 1, skip next blanket stitch around corners (Note: you may need to adjust how you work your corners depending on the degree of curve you have to your blanket’s corners), join.
Round 2: Ch 1 (does not count as stitch), work 1 sc in first st, 1 sc in next ch-1 sp, *1 sc in next st, 1 sc in next ch-1 sp, rep from * around, join.
Click here for a stitch diagram.
you may Also enjoy …
- Free Crochet Afghan Patterns
- Ruffle Edged Crochet Blanket
- Crochet Edged Tea Towel
- Printable Gift Tags for Your Handmade Gifts


Had a look at your US to UK terminology conversion chart.
Please correct it!
There is no such thing as Single Crochet in UK terms
Slip Stitch is Slip Stitch in crochet.
Same as the term Chain – neither of them change.
I can’t find baby blanket size with blanket stitch any where….only adult size. wher do you get them?
What size of hook do you suggest if you don’t have to do the blanket stitch?
The hook size should be that which is suggested for the yarn weight you are using.
I have several fleece blankets that I purchased that already have edging on them and hav been looking for patterns to add trim on them. Thank you! What size yarn do you suggest? 4 ply worsted or baby yarn?
You can really use anything you like. I prefer worsted because I feel like it goes best with the weight of the fleece, but it is really just a matter of preference.
Wow, I’ve made flannel and seersucker blankets for years with manually pushing through the material with a small needle or punching through with a craft awl. Thanks for sharing about the sharp needles. Just ordered!
I can’t find a sharp crochet hook, any suggestions for mail order?
Look for a hook called Edjit on Amazon. Perfect for this.
Hi Patti 🙂 I included links in the post for some sharp hook options that can be ordered. You can also find the Edgit Piercing hook on Amazon here: https://amzn.to/2NMOtlS.
Thank you for posting this! Helped me choose which edge I should do and how to do it on my first blanket 🙂
What a fabulous idea! Adding that edge gives such a new look to a regular store bought blanket. Thank you so much for sharing this today on TALU! Crochet is something I want to get better at.
These are so cute! My mom loves to crochet, so I’ll have to show her your post! Thanks!
I’ve been buying fleece fabric and crocheting borders around it to make blankets for years. You can also do this with the baby quilt panels you can buy. I use an ice pick to poke holes around the fleece or quilt panel to crochet into. I used to measure it out at 1/4 inch intervals and mark it with chalk but now I just “eyeball” it
You are the first tutorial for edging that I’ve seen that actually tell one how to attach a crochet egde to a blanket that has no edging. It’s so simple I guess other figured I could figure it out, but I appreciate showing how you used a sharp crochet hook and the idea to use the sewing machine to create an edge to crochet it is genius. Thank you SOOOOOOO much for breaking it down for a super beginner like me!!! This will allow me to do so much more with my crochet. Yay!
Thank you so much for sharing. Your tutorial is just perfect! I am teaching my Granddaughter(10) to crochet and you have helped both of us. She is excited to get started on her homemade Christmas gifts. :o)
Who knew they actually made “Sharp Crochet Hooks”??!! So glad I stopped by. Ordering one today.
Thank you,
Olivia
Beautiful, easy edgings. I have books with hundreds of edgings in them, but I love the simplitcity of these ones. I have now printed off your directions to add to my collection. I love making blankets and simple edgings are my faves.
Thanks so much for easy instructions.
Deanne
Sydney, Australia
xx
What a very nice comment! I’m glad you like them, Deanne!
I love the way you stitch with regular crochet thread first and then add the heavier thread. I may have to try this on my next blanket. I usually have them hemstitched but that adds to the cost of the blanket.
Thanks so much for your comment! It is definitely easier … and cheaper … than having to hemstitch each one 🙂
I make fleece blankets for Project Linus that use edges very similar to these. I use a “skip-stitch” tool to make the small holes in the fleece. Then I crochet through the holes & add whatever edge I feel like at that moment.
I love you for posting this. Found you over at Beez. I have been wanting to try a crochet edge but didn’t know where to begin. I think I can do this!!
I am glad it will help you! Let me know how you make out 🙂
I actually think I could do this with your tutorial! Very sweet!
Thanks, Sharon!
Thanks again for more wonderful patterns. The blankets are just darling. Thanks for sharing at Terrific Tuesdays.
Rachel
adventuresofadiymom.blogspot.com
It is my pleasure! Thanks for stopping by, Rachel!
I didn’t know they made sharp hooks! Another thing I need :o) Thanks for sharing, I have several blankets in the works, so these will come in handy.
Glad it was helpful! Thanks for stopping by!
Lovely! I love the edging.. Thanks for the tutorial
Visiting from Blog Hop Social
Witha @ withapinkie.blogspot.com
Thanks for stopping by 🙂
So cute and it gives it that added extra touch. Thanks so much for sharing with me at Toot Your Horn Tuesday 🙂
Great tutorial! Thanks for sharing. 🙂
Thanks so much for linking up this cute project @CountryMommaCooks….have a wonderful Sunday:)
Hello, I’m a new follower and found your link at the Overflowing With Creativity party. I’ve been wanting to add some crochet to homemade hankies and fleece blankets but wasn’t sure how to get started. Thanks so much for sharing your pattern. I’d love if you’d link up to my Frugal Treasures party.
I love these.. I wish I could crochet that well.. All I know is chain stitch and very little practice.. Thanks for linking up at friday fun party.. 🙂
I love these! The only way I have ever seen them done is with a hemstitcher that puts the holes in the fabric for you and you crochet though that. I used to live close enough to my mom who had one that I could use it. I am excited to try this way and maybe get one of those sharp hooks they look really cool!:)
Hi Kadie!! Yes, it is so much easier than with a hemstitcher. Thanks for stopping by 🙂
Very nice tutorial! I especially like the pink edging. 🙂
Thank you, Judy!
Beautiful ! All of them ! Thanks for the tutorials…
Hug
Anna
Thanks Anna!